SynthCam |
| このアプリは現在ストアで閲覧することができません。 | ||||


|
価格 | 無料 | ダウンロード |
|
|---|---|---|---|---|
| ジャンル | 写真/ビデオ | |||
サイズ | 3.0MB | |||
| 開発者 | Marc Levoy | |||
| 順位 |
| |||
| リリース日 | 2011-01-08 11:46:51 | 評価 |
|
|
| 互換性 | iOS 4.2以降が必要です。 iPhone、iPad および iPod touch 対応。 | |||
|
||||
 (5人)
(5人)
Have you ever wished you could take an iPhone picture that had a shallow depth of field like an SLR? Or a picture in a dark room that didn't come out noisy? Or a tilt-shift shot that makes the world look like a miniature model? This app lets you do all these things.
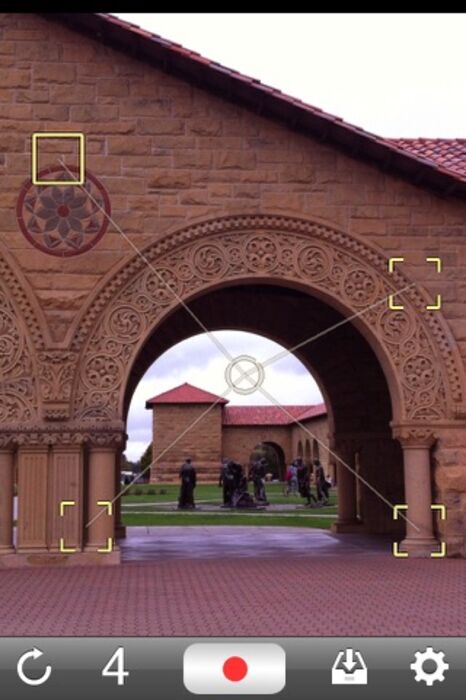
To use it, first find a scene that isn't moving (except for objects you'd like to blur out). Point the camera at a foreground object and press Record (red button). Make sure the object has some details the app can lock onto. Slowly move the phone left, right, up, and down, while keeping it aimed straight ahead. Don't tilt the camera, don't move it forward or backward, and don't move too far; an inch in each direction should suffice. After 10-15 seconds, press Pause (black bars) to view your "synthetic aperture photograph". The foreground object should appear sharp and the background blurry, like the first screenshot below. Photographers call this blur "bokeh". If the foreground comes out blurry instead, then tracking has failed. Touch to focus on a object with more detail, and try moving slower. This takes some practice.
For shooting in low light, do the same thing but record for only a second or two and hold the camera still. The app will track your subject, removing camera shake and sensor noise. The 4th screenshot below is a single frame, and the 5th screenshot is a 3-second recording. Although the goal is usually to translate the camera instead of tilting it, you can produce some cool effects if you break the rules. Read the description below (under What's New in Version 2.0) on simulating a tilt-shift lens.
How does SynthCam work? There are lots of apps out there that capture a single image and blur it to simulate a shallow depth of field. This app is different. Every 30th of a second it captures a video frame, tracks the object you pointed at, aligns it to the same object in previous frames you captured, and blends the frames together. You don't see this happening, and you don't see the result until you press Pause, but your iPhone is very, very busy. By the way, the native iPhone camera app lets you touch to focus, and objects you don't focus on are blurry. But because the iPhone's lens is small these objects are not very blurry. Using this app, you can create a much shallower depth of field. The tradeoff is that the output image is HD video resolution, not still photo resolution.
This app has been tested on an iPhone 4, iPhone 3GS, and iPod Touch 4. It may also work on an iPad 2, but it isn't optimized for that. If the app doesn't work for you, press Preferences (the gear icon), then Help, and read the Troubleshooting section. This help text, along with screenshots, examples, and some instructional videos, are available at http://marclevoy.com. If you come up with a great image, or think of a use for SynthCam I haven't mentioned here or on marclevoy.com, send me email! (Use synthcam@gmail.com.)
更新履歴
- SynthCam now offers multi-point focusing and tilted focal planes. The
number icon on the toolbar cycles through 1, 2, 3, and 4-point modes. In
each mode the solid square shows where the camera itself is metering and
focusing, and the open reticles show other points the app is tracking and
keeping sharp. These squares and reticles can be moved or resized by
dragging or pinching them.
If you had trouble producing sharp images using Version 1, then you should
try version 2. Being able to distribute multiple focusing points across
the foreground object makes a big difference. The 1st screenshot below
used 2 points, at the top and bottom of the cactus flower. The 2nd
screenshot shows what 4-point mode looks like before pressing Record.
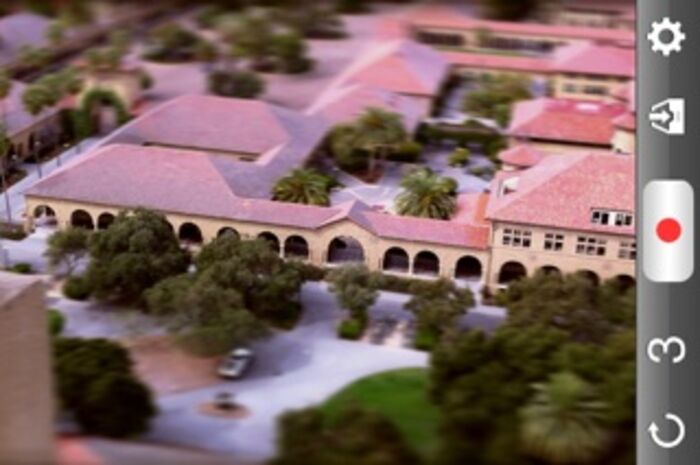
Multi-point focusing not only lets you align the focal plane with any
collection of objects in the scene; it also lets you simulate a tilt-shift
lens. To do this, place 2 or 3 points along a line through the scene, then
rotate the phone slowly and continuously while recording. With some
practice you can take pictures that make the world look like a miniature
model. Look at the 3rd screenshot below. For a quick visual tutorial on
how to use multi-point focusing, check out the video at
http://www.youtube.com/watch?v=S1tLoFVl6a8.
- Synthetic images are sharpened when stored in the Camera Roll. Tracking
and resampling induce a consistent 1-pixel blur, so mild unsharp masking
works well for this purpose. The level of sharpening is adjustable on the
Preferences screen.
- A collection of algorithms that makes tracking more robust: by predicting
where the focusing square might go next and moving it there, by detecting a
wandering focus square and freezing it before it starts jumping around,
etc. The accelerometer is still used to correct pitching and rolling as
in version 1.1, but only in 1-point focusing mode.
Minor improvements and bug fixes:
- Redesigned focusing square to make it visible against any background.
- Tuned what things get reset on single and double tap of Reset button.
- Tracked features can be closer to the edge of the screen than before.
- More graceful if tracking is lost or a tracked feature wanders offscreen.
To use it, first find a scene that isn't moving (except for objects you'd like to blur out). Point the camera at a foreground object and press Record (red button). Make sure the object has some details the app can lock onto. Slowly move the phone left, right, up, and down, while keeping it aimed straight ahead. Don't tilt the camera, don't move it forward or backward, and don't move too far; an inch in each direction should suffice. After 10-15 seconds, press Pause (black bars) to view your "synthetic aperture photograph". The foreground object should appear sharp and the background blurry, like the first screenshot below. Photographers call this blur "bokeh". If the foreground comes out blurry instead, then tracking has failed. Touch to focus on a object with more detail, and try moving slower. This takes some practice.
For shooting in low light, do the same thing but record for only a second or two and hold the camera still. The app will track your subject, removing camera shake and sensor noise. The 4th screenshot below is a single frame, and the 5th screenshot is a 3-second recording. Although the goal is usually to translate the camera instead of tilting it, you can produce some cool effects if you break the rules. Read the description below (under What's New in Version 2.0) on simulating a tilt-shift lens.
How does SynthCam work? There are lots of apps out there that capture a single image and blur it to simulate a shallow depth of field. This app is different. Every 30th of a second it captures a video frame, tracks the object you pointed at, aligns it to the same object in previous frames you captured, and blends the frames together. You don't see this happening, and you don't see the result until you press Pause, but your iPhone is very, very busy. By the way, the native iPhone camera app lets you touch to focus, and objects you don't focus on are blurry. But because the iPhone's lens is small these objects are not very blurry. Using this app, you can create a much shallower depth of field. The tradeoff is that the output image is HD video resolution, not still photo resolution.
This app has been tested on an iPhone 4, iPhone 3GS, and iPod Touch 4. It may also work on an iPad 2, but it isn't optimized for that. If the app doesn't work for you, press Preferences (the gear icon), then Help, and read the Troubleshooting section. This help text, along with screenshots, examples, and some instructional videos, are available at http://marclevoy.com. If you come up with a great image, or think of a use for SynthCam I haven't mentioned here or on marclevoy.com, send me email! (Use synthcam@gmail.com.)
更新履歴
- SynthCam now offers multi-point focusing and tilted focal planes. The
number icon on the toolbar cycles through 1, 2, 3, and 4-point modes. In
each mode the solid square shows where the camera itself is metering and
focusing, and the open reticles show other points the app is tracking and
keeping sharp. These squares and reticles can be moved or resized by
dragging or pinching them.
If you had trouble producing sharp images using Version 1, then you should
try version 2. Being able to distribute multiple focusing points across
the foreground object makes a big difference. The 1st screenshot below
used 2 points, at the top and bottom of the cactus flower. The 2nd
screenshot shows what 4-point mode looks like before pressing Record.
Multi-point focusing not only lets you align the focal plane with any
collection of objects in the scene; it also lets you simulate a tilt-shift
lens. To do this, place 2 or 3 points along a line through the scene, then
rotate the phone slowly and continuously while recording. With some
practice you can take pictures that make the world look like a miniature
model. Look at the 3rd screenshot below. For a quick visual tutorial on
how to use multi-point focusing, check out the video at
http://www.youtube.com/watch?v=S1tLoFVl6a8.
- Synthetic images are sharpened when stored in the Camera Roll. Tracking
and resampling induce a consistent 1-pixel blur, so mild unsharp masking
works well for this purpose. The level of sharpening is adjustable on the
Preferences screen.
- A collection of algorithms that makes tracking more robust: by predicting
where the focusing square might go next and moving it there, by detecting a
wandering focus square and freezing it before it starts jumping around,
etc. The accelerometer is still used to correct pitching and rolling as
in version 1.1, but only in 1-point focusing mode.
Minor improvements and bug fixes:
- Redesigned focusing square to make it visible against any background.
- Tuned what things get reset on single and double tap of Reset button.
- Tracked features can be closer to the edge of the screen than before.
- More graceful if tracking is lost or a tracked feature wanders offscreen.
ブログパーツ第二弾を公開しました!ホームページでアプリの順位・価格・周辺ランキングをご紹介頂けます。
ブログパーツ第2弾!
アプリの周辺ランキングを表示するブログパーツです。価格・順位共に自動で最新情報に更新されるのでアプリの状態チェックにも最適です。
ランキング圏外の場合でも周辺ランキングの代わりに説明文を表示にするので安心です。
サンプルが気に入りましたら、下に表示されたHTMLタグをそのままページに貼り付けることでご利用頂けます。ただし、一般公開されているページでご使用頂かないと表示されませんのでご注意ください。
幅200px版
幅320px版
お気に入りのアプリをご紹介頂くためのブログパーツです。アプリの価格や順位表示は毎日自動更新♪
サンプルが気に入りましたら、下に表示されたHTMLタグをそのままページに貼り付けることでご利用頂けます。
※配信を停止させていただく可能性もございますので、タグの改変はご遠慮ください。

Now Loading...

「iPhone & iPad アプリランキング」は、最新かつ詳細なアプリ情報をご紹介しているサイトです。
お探しのアプリに出会えるように様々な切り口でページをご用意しております。
「メニュー」よりぜひアプリ探しにお役立て下さい。
Presents by $$308413110 スマホからのアクセスにはQRコードをご活用ください。 →
Now loading...